I. Click your Apple menu

II. Click About This Mac

A window with your OS X version will appear.

I. Click your Apple menu
II. Click About This Mac
A window with your OS X version will appear.
Assuming Apple have released an update to the current OS X version, here’s how to update:
I. Click App store.
![]()
II. Click updates.
III. You will notice an available Software Update. Click the update button.


Wait until the update is finished and then reboot your mac. The update will be installed and you will have your system updated.
Before After


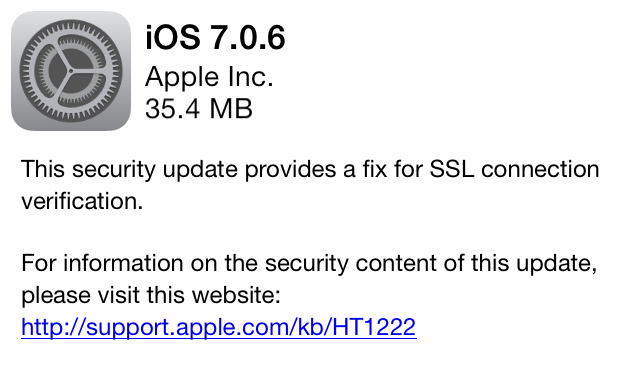
The notorious SSL bug that makes your iPhone, iPod or iPad and Mac vulnerable to attacks via network is finally patched in OS X. Versions of iOS have been already updated to 7.0.6 for iOS 7 and 6.1.6 for iOS 6. Go to the App Store app and update your Mac!

This is a serious bug as an attacker could capture or modify data from your device via network by bypassing SSL/TLS verification. Apple released updates for patching this bug on both iOS 6 and iOS 7, which are 6.1.6 and 7.0.6 respectively. Currently, there is no update for OS X but be sure that there will be one pretty soon. Edit: It is available!
You can use this website https://gotofail.com which tests if your browser is vulnerable or not. If your device is update of course you will not be vulnerable to attacks.
You can update your iPhone, iPad or iPod fast by doing an OTA (Over the air) update by going to Settings>General>Software Update>Update (It is highly recommended though to mainly update through iTunes). Be sure to not miss this one, it is pretty serious.
You should always have firewall enabled as it is a very important security feature.
I. Click System Preferences.

II. Click Security & privacy.

III. Click the lock.

IV. Type your Password. Username will be already written.

V. Click Turn On Firewall.

VI. Firewall is now on.

I. Click Finder and then Preferences.

II. Make sure External disks is selected.

Your external disk will appear on the desktop every time you plug it in.
There are two ways to enable dock magnification in OS X.

First way to do it:
I. Click Settings
II. Select Dock

III. Enable Magnification by ticking the box and define the icons’ size when being magnified.

Second way to do it:
I. Click your Apple menu

II. Select Dock and Click Turn Magnification On. However, you cannot modify the icons’ size when being magnified.

First of all, why should you repair permissions of your OS X installation? The reason is simple, performance. You can learn more about repairing disk permissions at Apple’s website: http://support.apple.com/kb/HT1452?viewlocale=en_US&locale=en_US .
What disk utility essentially does, is find permissions at files that have changed values and then repair them, thus bringing them to their original values.
Here is how to do it.
I. Click your Launchpad.
![]()
II. Select Other and then Disk Utility.


III. Click Verify Disk Permissions.

IV. Verifying Disk Permissions will begin. Normally there will be a list of errors. It has already been done in this Mac before.

V. When it ends, click Repair Disk Permissions. Now your list of errors will be repaired.

VI. Done! Permissions repair is complete.

During Disk Permissions repair, you will encounter lots of and different error messages. Apple has a list of them here: http://support.apple.com/kb/ts1448 and acknowledges that they are not an issue.
Many OS X users did not like the new update to Apple’s iWork, because even if it was new, with new transitions and an upgraded look, it lacked some old features. However, when updating to the newest iWork (version 7), old files are kept and you can still access the old one.
Here’s how to do it:
I. Click Finder.

II. Go to Applications and find iWork 09 folder.

III. Open it.

Or a faster way to do it:
Click Spotlight on the upper right corner and type the app you are looking for, e.g. Keynote.

I. Click Safari button.
II. Then Reset Safari.

III. Remove all website data.

